Katy Perry
The One That Got Away chords
The One That Got Away by Katy Perry is an intermediate song in E, played with a capo on fret 4. The whole sheet is 4 chords (C, Em, Am, F) across 2 sections: Verse loop study → Chorus loop study. 3 of the 4 shapes are open chords. Shapes that use a barre: F. It sits at roughly 80 BPM.
Simplified practice arrangement. Section repetitions are practice cues rather than a verified transcription of the recording.
By Chiye · Updated
Hardest change in the sheet: Am → F, 4 times.
- Difficulty
- Intermediatebarre shape F
- Key
- Ewith a capo on fret 4
- Tempo
- 80BPM
- Tuning
- Standard (E A D G B E)low to high
- Chords
- 43 open, 1 with a barre
- Sections
- 2each with its own progression
Chords in The One That Got Away
Frets read low E to high E, x means leave that string out.
Chord sheet
One chord per bar in this practice sheet. Follow the time signature shown beside each section; dots mark the remaining counts in the bar. Tap a bar to hear its chord, or loop the section to practise the changes.
Chord accompaniment only. Follow the section notes for this arrangement’s timing. Songs whose words are public domain →
Verse loop study4/4 · ♩=80
Chorus loop study4/4 · ♩=80
Printable one-page chord chart
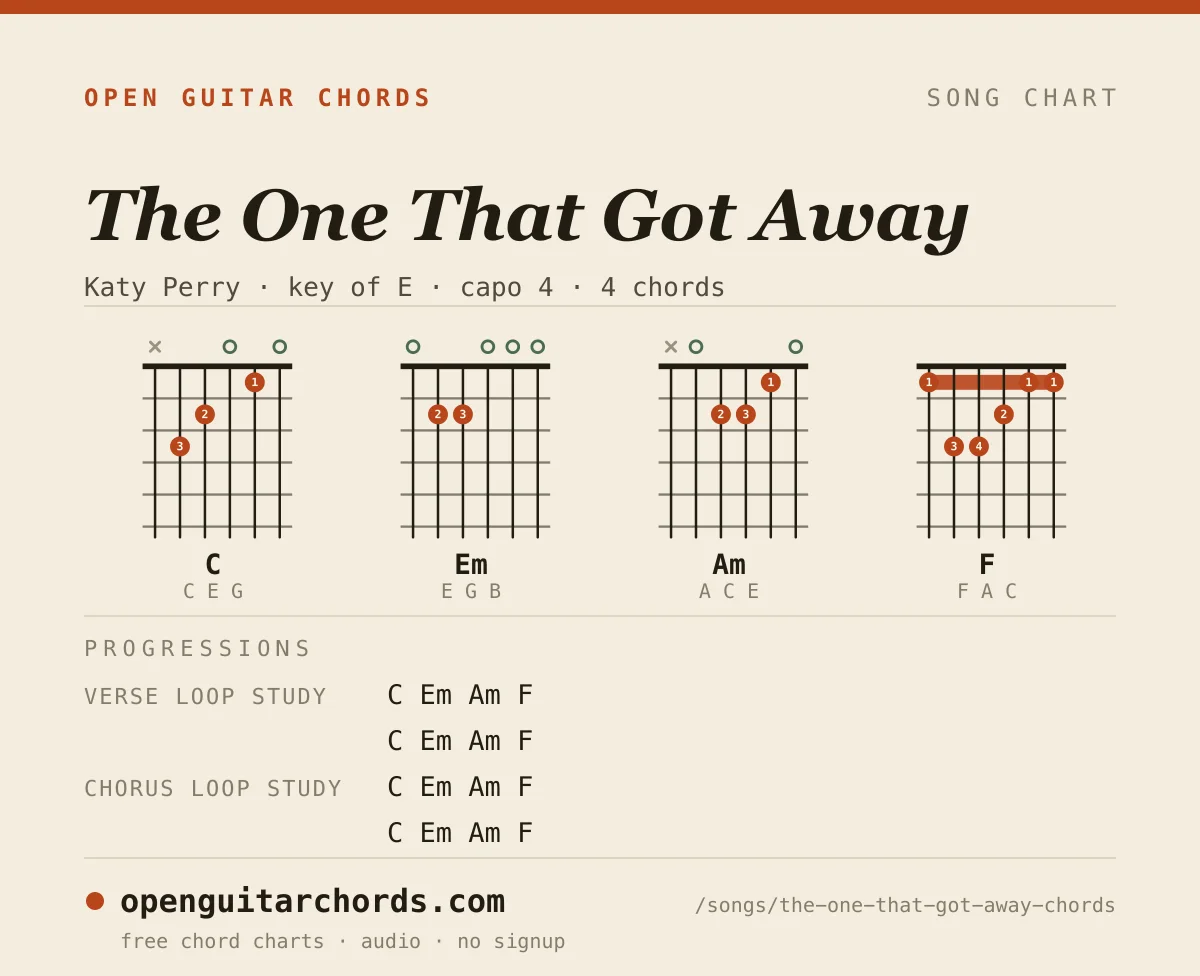
How to play The One That Got Away
The One That Got Away by Katy Perry can be practised with C, Em, Am and F shapes and capo 4. In standard tuning those fingers sound E, G#m, C#m and A. This sheet studies the central verse and chorus loop at 80 BPM, with four beats for every box. It is a focused accompaniment exercise, not a complete transcription of every section or recording detail.
Match the capo version to the sounding chords
Katy Perry’s official acoustic chord video shows the opening harmony moving through E major, G# minor, C# minor and A major. Its G# minor is displayed with the enharmonic label Ab minor. The C–Em–Am–F shapes under capo 4 produce those same sounding chord roots and qualities. The C symbol describes what your fingers play, while E describes what listeners hear.
Read all fret numbers from the capo. The two fretted strings in an Em shape sit two frets above it, at physical fret 6. An open string rings from the capo itself, not from the nut. Tune carefully after fitting it and check that every string speaks clearly. Do not also transpose the written C shape up to E unless you intentionally want another four-semitone rise.
Keep Em and Am distinct under the fingers
Em is 0-2-2-0-0-0. Am is x-0-2-2-1-0, so this change does more than move a single finger sideways. Em’s low E may sound; Am begins from the fifth string. Prepare the Am shape while keeping the previous bar’s count, then land its bass on the next first beat. Avoid letting the open low E keep ringing loudly beneath the new chord.
The C-to-Em change also alters the bass range. C starts on the fifth string and Em opens the sixth again. Test the three open-position shapes with single strokes before bringing F into the sequence. That lets you hear whether an uneven sound comes from a left-hand finger or from striking an unwanted lower string. Keep the four-bar practice cycle moving even while using very quiet strokes.
Build the F grip without changing the harmony
The printed F is 1-3-3-2-1-1, relative to the capo. Its index-finger barre is physically at fret 5 with capo 4 fitted. The capo raises the whole instrument’s open reference; it does not make the fretting-hand barre for you. Check the high strings first, then add the lower notes without squeezing harder than necessary.
An Fmaj7 grip would introduce E into the shape and G# into the sounding A chord. That is a major-seventh colour, not a completely equivalent way to play the selected harmony. A smaller F voicing can keep the same three chord tones if its unwanted strings are muted. Treat that as a separate fingering choice and inspect the actual notes rather than accepting a different chord name as an automatic shortcut.
Use the loop as a study, not an entire song map
The Easy 2 Play Music lesson documents the capo-4 approach and a fuller chord vocabulary. This page deliberately selects the central four-chord loop. Each displayed verse or chorus contains two practice passes; those repeats were chosen for the exercise. They do not establish the number of bars in the commercial recording, and the bridge is outside these two studies.
The published lead sheet lists E major and credits Katy Perry, Lukasz Gottwald and Max Martin. Its tempo marking belongs to that publication; the 80 BPM clock here is a slower coordination target. Start with the four downstrokes, keep the last F bar intact, and return to C without adding an extra pause. Study the full source separately before coordinating a vocal or arranging an ending.
How to practise The One That Got Away
Four steps computed from this sheet: the order the shapes are easiest to learn in, the changes that really occur in the progressions above, where each chord turns up, and the tempo ladder up to the speed marked here.
Learn the shapes easiest first
C (x-3-2-0-1-0, beginner) → Em (0-2-2-0-0-0, beginner) → Am (x-0-2-2-1-0, beginner) → F (1-3-3-2-1-1, intermediate, needs a barre)
3 of the 4 shapes are open chords, so start there and leave F until the others change cleanly.
Drill the changes this sheet actually uses
Am → F4×C → Em4×Em → Am4×
These counts come from the progressions on this page, so they are the changes you will actually play, not a generic list of pairs to practise.
Know where each chord turns up
- Cevery section
- Emevery section
- Amevery section
- Fevery section
Climb the tempo ladder
Start at 48 BPM and move up only when a full pass is clean: 48 → 60 → 72 → 80 BPM. The tempo marked on this sheet is 80 BPM, and the last step is the one that always feels like a jump. Stay at 72 for longer than feels necessary.
Practise each section's chord changes slowly, then play the sheet through at a steady tempo without pausing between sections.
Playing The One That Got Away with a capo
This sheet is written with a capo on fret 4. Each card shows what you would finger at that capo position so the song still sounds exactly as written. Useful when the shapes above are awkward, or when you want to sing it higher without learning new chords.
No capo
E Abm C#m A
2 of 4 stay open
Fret 1
Eb Gm Cm Ab
no open shapes left, all barre
Fret 2
D F#m Bm G
2 of 4 stay open
Fret 3
C# Fm Bbm F#
no open shapes left, all barre
Fret 4as written
C Em Am F
3 of 4 stay open
Fret 5
B Ebm Abm E
1 of 4 stay open
Fret 6
Bb Dm Gm Eb
1 of 4 stay open
Fret 7
A C#m F#m D
2 of 4 stay open
Working out a different key? The capo calculatordoes the same arithmetic for any chord set.
More songs built on the same chords
If The One That Got Away clicks, these use the closest set of shapes, so the chords you just learned keep working.
More intermediate songs to learn after this one: Father and Son, 500 Miles, Shallow, Landslide.
These chords across the songbookHow often each chord in The One That Got Away turns up across all 104 songs on this site, and what it most often moves to next. The counts come from the sheet library itself, not from theory.
420bars of this chord across the songbook
70songs use this shape
Most often followed by G, 115×.
155bars of this chord across the songbook
43songs use this shape
Most often followed by C, 27×.
125bars of this chord across the songbook
35songs use this shape
Most often followed by F, 23×.
114bars of this chord across the songbook
29songs use this shape
Most often followed by C, 38×.