Bart Howard
Fly Me to the Moon chords
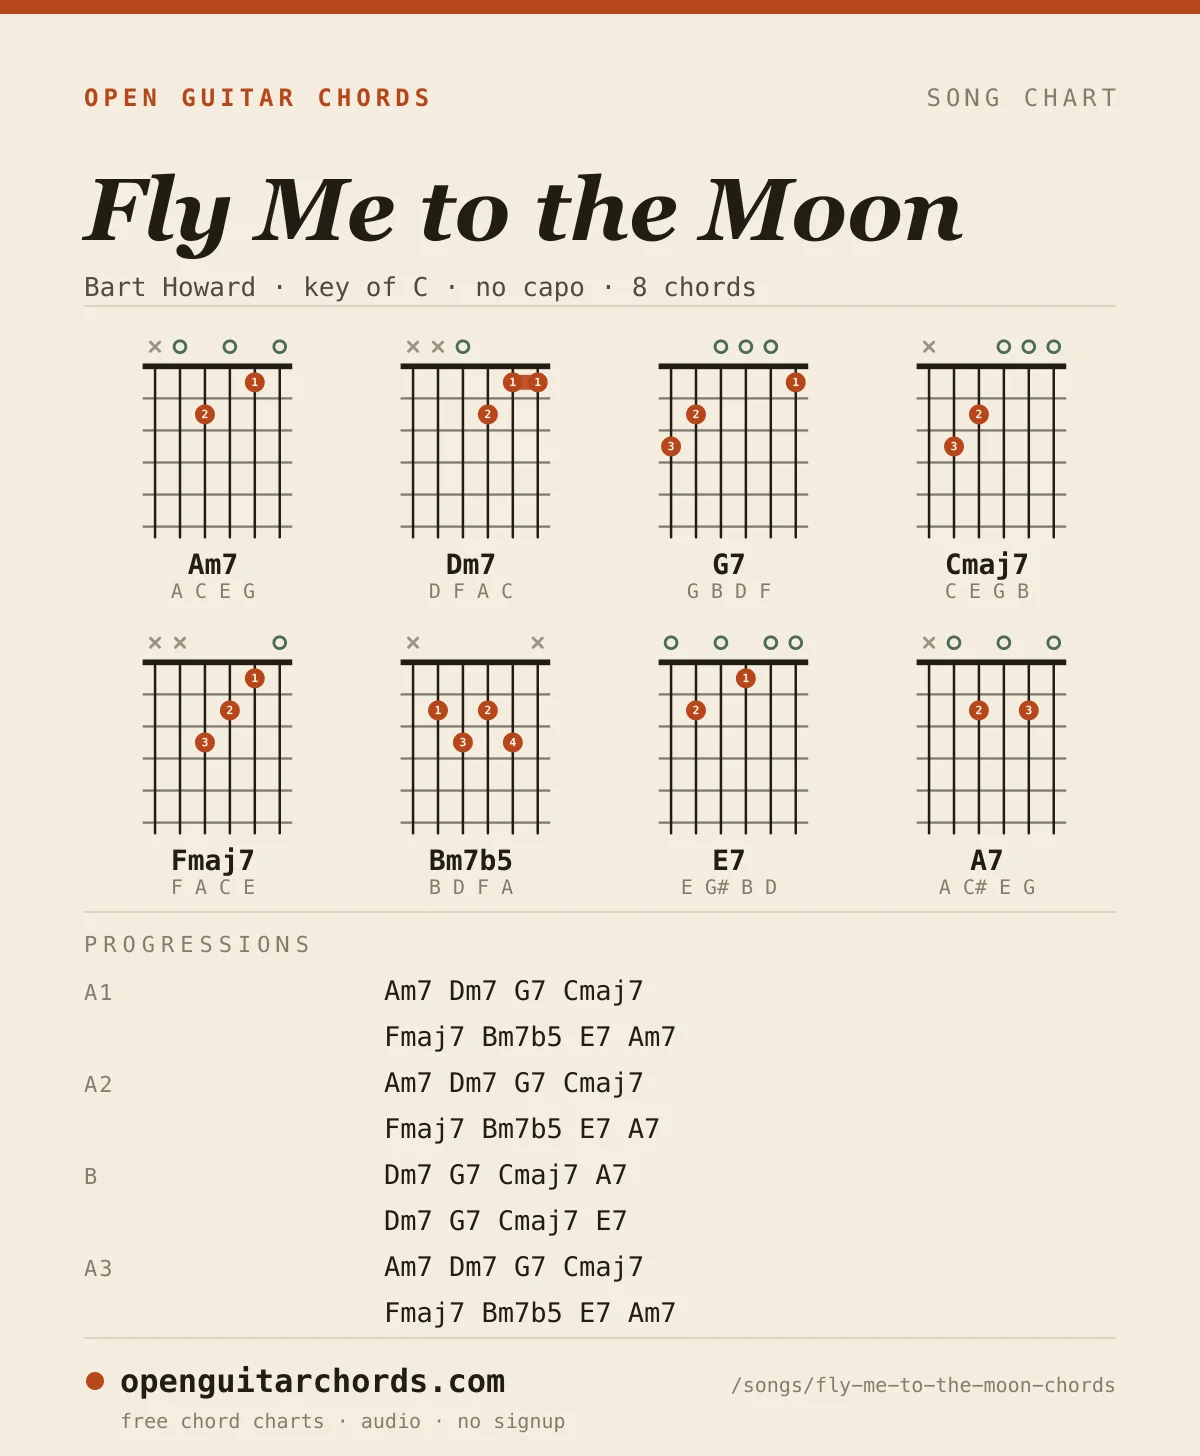
Fly Me to the Moon by Bart Howard is an intermediate song in C, played with no capo. The whole sheet is 8 chords (Am7, Dm7, G7, Cmaj7, Fmaj7, Bm7b5, E7, A7) across 4 sections: A1 → A2 → B → A3. 7 of the 8 shapes are open chords. Shapes that use a barre: Dm7. It sits at roughly 120 BPM.
By Chiye · Updated
Hardest change in the sheet: Bm7b5 → E7, 3 times.
- Difficulty
- Intermediatebarre shape Dm7
- Key
- Cwith no capo
- Tempo
- 120BPM
- Tuning
- Standard (E A D G B E)low to high
- Chords
- 87 open, 1 with a barre
- Sections
- 4each with its own progression
Chords in Fly Me to the Moon
Frets read low E to high E, x means leave that string out.
Chord sheet
One chord per bar in this practice sheet. Follow the time signature shown beside each section; dots mark the remaining counts in the bar. Tap a bar to hear its chord, or loop the section to practise the changes.
Chord accompaniment only. Follow the section notes for this arrangement’s timing. Songs whose words are public domain →
A14/4 · ♩=120
A24/4 · ♩=120
B4/4 · ♩=120
A34/4 · ♩=120
Printable one-page chord chart
How to play Fly Me to the Moon
This practice arrangement uses 4/4, with one chord per cell. The song also exists in waltz arrangements, but the section grids here follow the common four-beat jazz accompaniment. Count four for each bar rather than three.
The opening Am7, Dm7, G7 and Cmaj7 is vi–ii–V–I in C major. Fmaj7, Bm7b5 and E7 then lead back to Am7. E7 contains G#, the leading note of A minor, which is why that return has a stronger pull than plain Em.
Start with the open Am7 and Dm7 shapes in the diagrams. Am7 releases the G-string finger from Am; Dm7 uses a small barre on the top two strings. For Bm7b5, x-2-3-2-3-x supplies the root B on the A string, so keep it audible when playing alone.
Loop the first four bars at a comfortable tempo, then add the second row. In the B section, practise Dm7 to G7 to Cmaj7 before joining its A7 and E7 endings. Keep the chords short and the pulse steady as you connect the full form.
How to practise Fly Me to the Moon
Four steps computed from this sheet: the order the shapes are easiest to learn in, the changes that really occur in the progressions above, where each chord turns up, and the tempo ladder up to the speed marked here.
Learn the shapes easiest first
Am7 (x-0-2-0-1-0, beginner) → G7 (3-2-0-0-0-1, beginner) → Cmaj7 (x-3-2-0-0-0, beginner) → Fmaj7 (x-x-3-2-1-0, beginner) → E7 (0-2-0-1-0-0, beginner) → A7 (x-0-2-0-2-0, beginner) → Dm7 (x-x-0-2-1-1, intermediate, needs a barre) → Bm7b5 (x-2-3-2-3-x, advanced)
7 of the 8 shapes are open chords, so start there and leave Dm7 until the others change cleanly.
Drill the changes this sheet actually uses
Dm7 → G75×G7 → Cmaj75×Am7 → Dm73×Bm7b5 → E73×
These counts come from the progressions on this page, so they are the changes you will actually play, not a generic list of pairs to practise.
Know where each chord turns up
- Am7A1, A2, A3
- Dm7every section
- G7every section
- Cmaj7every section
- Fmaj7A1, A2, A3
- Bm7b5A1, A2, A3
- E7every section
- A7A2, B
Climb the tempo ladder
Start at 72 BPM and move up only when a full pass is clean: 72 → 90 → 108 → 120 BPM. The tempo marked on this sheet is 120 BPM, and the last step is the one that always feels like a jump. Stay at 108 for longer than feels necessary.
Practise each section's chord changes slowly, then play the sheet through at a steady tempo without pausing between sections.
Playing Fly Me to the Moon with a capo
This sheet needs no capo. Each card shows what you would finger at that capo position so the song still sounds exactly as written. Useful when the shapes above are awkward, or when you want to sing it higher without learning new chords.
No capoas written
Am7 Dm7 G7 Cmaj7 Fmaj7 Bm7b5 E7 A7
7 of 8 stay open
Fret 2
Gm7 Cm7 F7 Bbmaj7 Ebmaj7 Am7b5 D7 G7
3 of 8 stay open
Fret 5
Em7 Am7 D7 Gmaj7 Cmaj7 F#m7b5 B7 E7
8 of 8 stay open
Fret 7
Dm7 Gm7 C7 Fmaj7 Bbmaj7 Em7b5 A7 D7
5 of 8 stay open
Working out a different key? The capo calculatordoes the same arithmetic for any chord set.
More songs built on the same chords
If Fly Me to the Moon clicks, these use the closest set of shapes, so the chords you just learned keep working.
More intermediate songs to learn after this one: Father and Son, 500 Miles, Shallow, The One That Got Away.
These chords across the songbookHow often each chord in Fly Me to the Moon turns up across all 104 songs on this site, and what it most often moves to next. The counts come from the sheet library itself, not from theory.
23bars of this chord across the songbook
6songs use this shape
Most often followed by Dm7, 4×.
29bars of this chord across the songbook
6songs use this shape
Most often followed by G7, 13×.
33bars of this chord across the songbook
13songs use this shape
Most often followed by C, 11×.
8bars of this chord across the songbook
3songs use this shape
Most often followed by C7, 2×.
15bars of this chord across the songbook
5songs use this shape
Most often followed by C, 4×.
3bars of this chord across the songbook
1songs use this shape
Most often followed by E7, 3×.
31bars of this chord across the songbook
10songs use this shape
Most often followed by A7, 4×.
49bars of this chord across the songbook
15songs use this shape
Most often followed by Dm7, 10×.